- 9 February 2025
- /
- BLOG, MEDICAL DEVICES, NEWS, VESTECH MEDICAL
Reimbursement Risk in Medical Device Innovations
Time-strapped professionals in the medical device space!
I know you'r
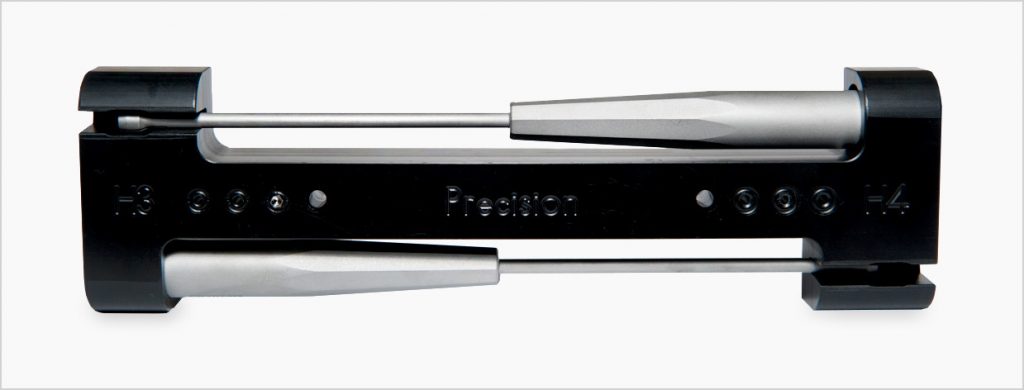
The Precision Screw Driver is intended to drive the Precision Screw into the vertebral cortical bone. The reusable Precision Driver is manufactured from biocompatible materials and requires no servicing or disassembly prior to reprocessing.
The Precision Driver is available in 2 sizes to suit the Precision Screw catalogue range only and should only be stored using the Precision Tray.
Please refer to the following PDF document for information and Instructions regarding the correct use of The Precision Screw

Yes. Drivers are to be reprocessed by as per Cryptych’s Instructions for Re-processing Reusable Devices (DMR02-06). This consists of cleaning the device, using an enzymatic solution, until all visible signs of soiling have been removed and visually inspecting the part for damage. Then it is dried, packaged and autoclave sterilised. Driver is to be stored in a dry, clean conditions at ambient room temperature after sterilisation.
Yes, however first individually clean, inspect and dry the parts as per Cryptych’s Instructions for Re-processing Reusable Devices (DMR02-06). Then place the Drivers into the pre-defined locations on the Driver, package the assemble and autoclave sterilise using the recommended cycle on the IFU.
No. A unique Driver is used for each Screw. Precision Screw Driver CRY02-H4 is required for Precision Screw CRY01-H4-1E, and Precision Screw Driver CRY02-H3 is required for Precision Screw CRY01-H3-1E
Verify the appropriate Driver is being used for the Screw:
If it is the correct Driver and Screw combination, check both parts for any burrs, rough edges or other physical causes for preventing the Driver to engage with Screw. The driver’s jaws can be slightly opened using an osteotome or similar tool to reduce the tightness of fit. If all else fails then replace Driver or Screw, depending on which part has visible damage.
Verify the appropriate Driver is being used for the Screw:
If it is the correct Driver and Screw combination, check Driver for signs of wear at the tip. Place the Driver into the appropriate checking hole, and push down, crimping the driver to the correct dimension. Use a different Driver if physical damage is sighted on Driver tip, otherwise try Driver with a new Screw.
Do not use a dropped Driver for rest of the case. Open a cleaned and sterilised Driver from its packaging for use during the rest of the case. The Precision screw can still be inserted by holding it at the head with an artery forcep or similar tool and rotating into bone. A starter hole fashion with a 2mm burr greatly assists this process.
Slide the metal shaft, halfway along its length, down the slot until it bottoms out with the handle facing the blind hole. Then slide the driver along its longitudinal axis until the handle engages snugly with the blind hole (see Figure 1). The driver is now secure in the Tray. Both Precision Screw Drivers are compatible in the positions shown in Figure 1.
The Screw won’t release from the Driver – what should I do?

Time-strapped professionals in the medical device space!
I know you'r
Innovation in the medical device sector has the potential to revolutionize healthcare, improve patient outcomes, and reduce overall costs....